SVG
SVG(Scalable Vector Grapics)
SVG(Scalable Vector Graphics)는 2차원 벡터 그래픽을 서술하는 XML 기반의 마크업 언어이다.
SVG는 텍스트 기반의 열린 웹 표준 중 하나로, 모든 사이즈에서 깔끔하게 렌더링 되는 이미지를 서술하며 CSS, DOM, JavaScript, SMIL, (en-US) 등 다른 웹 표준과도 잘 작동하도록 설계됐다.
SVG는 달리 말하자면 HTML과 텍스트의 관계를 그래픽에 적용한 것이다.
HTML5 에서 SVG
- HTML5 에서 SVG와 Canvas
- HTML5에서 가장 눈에 띄는 변화는 강력해진 멀티미디어 지원
- HTML5에서는 그래픽을 그릴 수 있는 2개의 기술이 있다.
- SVG는 새로운 기술은 아니고, HTML과 별개로 존재하던 기술을 HTML5 포함 시킨것이다.
SVG는 벡터방식
Scalable Vector Graphic
XML 기반의 표준 벡터 그래픽 포멧
인터렉티브하고 애니메이션이 가능
CSS로 SVG를 스타일링 할 수 있고, SVG COM을 이용하여 동적인 비헤이비어 추가가능
<object>태그를 이용하여 표준 xhtml안에 추가이미지를 구성하는 기본 도형을 마크업으로 나타낸다.
해상도에 관계없이 깔끔한 이미지
이미지 구성요소들의 추가, 삭제, 이동, 축소, 확대 등이 자유롭다.
애니메이션을 좀 더 쉽게 사용할 수 있다.
현재 플래시를 대처하기에 알맞음. (메뉴, 동적 그래프, 애니메이션)
Canvas는 비트맵방식 (bitmap, raster)
이미지를 픽셀단위로 처리, 이를 위한 자바스크립트 API가 존재
벡터 처리방식에 비해 보다 복잡한 그래픽을 더 빠른 속도로 처리할 수 있다.
3D를 위한 API도 있으며 따로 떨어져 WebGL이 됨
그래프 객체
다양한 자바스크립트로 드로잉 API들을 제공
실제로 드로잉 하기 위해 다음 옵션을 사용
2D 드로잉 컨텍스트
3D 드로잉 컨텍스트 (WEbGL)
빠르게 드로잉 연산 수행.
파일 포멧이 아니라 단지 스크립트를 이용하는 것
SVG는 기본 데이터 파일 구조가 xml 형태로 저장된다.
그래서 그래픽 요소들 즉 선, 원, 사각형들을 하나하나의 객체로 자바스크립트에서 접근하여 조작할 수 있다.
그러나 Canvas는 하나의 비트맵상에서 컨텍스트를 얻어와 그림을 그린다. 비트맵 전체를 하나의 객체로 접근해야 한다.
마치 svg는 cad, word나 파워포인트에서 그림을 그리는 것과 같고 Canvas는 그림판에 그림을 그리는 것과 같다.
데이터와 소스의 분리
- SVG는 데이터만 XML파일에 저장되어 있기 때문에 데이터만 전달해도 된다.
- Canvas는 자바스크립트로 그림을 그리기 때문에 소스코드도 함께 전달해야 한다.
SVG 사용방법
1
<svg></svg>
- 원이나 타원뿐 아니라 모든 그래픽 표현가능 (원,다각형)
- 특수효과 알파값
- 회전 위치조정등의 트랜스포메이션
- 애니메이션
- 그라디언트
- 자바스크립트로 그래픽을 접근하여 수정가능
사각형 Rectangle
1
2
3
* {margin: 30px; padding: 0;}
#exampleSub.bg{background:url(./img/line.jpg) 0 0 repeat;}
#exampleSub svg{width: 1000px; height: 250px;}
1
2
3
4
5
6
<div id="exampleSub">
  <svg>
    <rect width="100" height="100" />
    <rect x="100" y="100" width="100" height="100" rx="50" ry="20" />
  </svg>
</div>
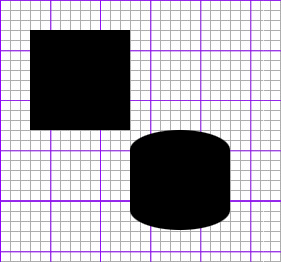
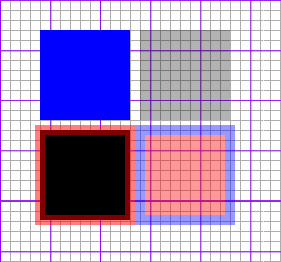
SVG 요소의 스타일 지정
- fill: 채움 색상
- stroke: 선 색상
- stroke-width: 선 두께
- opacity: 투명도
1
#cssControl{fill:#f00; stroke:rgb(0,0,255); stroke-width:10; opacity:0.4;}
1
2
3
4
5
6
7
8
<div id="exampleSub" class="bg">
  <svg>
    <rect x="10" width="90" height="90" style="fill:#00f" />
    <rect x="110" y="0" width="90" height="90" style="opacity:0.3" />
    <rect x="10" y="100" width="90" height="90" style="stroke-width:10;stroke:rgba(255,0,0,0.5)" /> <!-- 안,밖 반반-->
    <rect id="cssControl" x="110" y="100" width="90" height="90" />
  </svg>
</div>
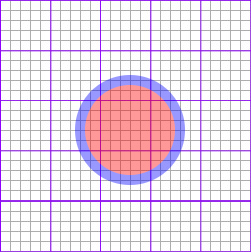
원형
원을 생성함
1
<circle cx="[cx]" cy="[cy]" r="[r]" />
속성
- cx: 원 중심점의 X좌표
- cy: 원 중심점의 Y좌표
- r: 원의 반지름
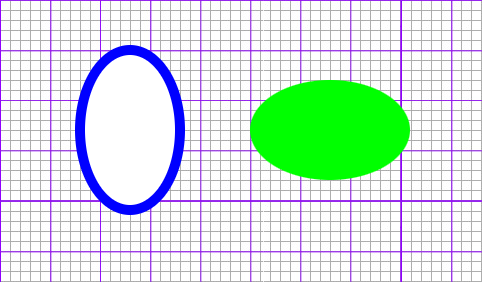
타원형
타원을 작성
속성
- cx: 타원 중점의 X좌표
- cy: 타원 중점의 Y좌표
- rx: 타원의 횡축 반지름
- ry: 타원의 종축 반지름
1
2
3
4
5
6
*{margin: 30px; padding: 0;}
#exampleSub.bg{background:url(./img/line.jpg) 0 0 repeat;}
#exampleSub svg{width: 1000px; height: 250px;}
#cssControl{fill:#f00; stroke:rgb(0,0,255); stroke-width:10; opacity:0.4;}
#ellipse01{fill:#fff; stroke:rgb(0,0,255); stroke-width:10;}
#ellipse02{fill:#0f0;}
1
2
3
4
5
6
<div id="exampleSub" class="bg">
  <svg>
    <ellipse id="ellipse01" cx="100" cy="100" rx="50" ry="80" />
    <ellipse id="ellipse02" cx="300" cy="100" rx="80" ry="50" />
  </svg>
</div>
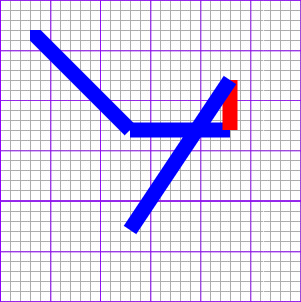
라인
직선의 작성
1
<line x1="[x1]" y1="[y1]" x2="[x2]" y2="[y2]" />
속성
- x1: 직선 시점의 X좌표
- y1: 직선 시점의 y좌표
- x2: 직선 종점의 X좌표
- y2: 직선 종점의 y좌표
1
2
3
4
5
6
*{margin: 30px; padding: 0;}
#exampleSub.bg{background:url(./img/line.jpg) 0 0 repeat;}
#exampleSub svg{width: 1000px; height: 250px;}

.lineClass{stroke:#00f; stroke-width:15;}
#lineId{stroke:#f00; stroke-width:15;}
1
2
3
4
5
6
7
8
<div id="exampleSub" class="bg">
  <svg>
    <line class="lineClass" x1="0" y1="0" x2="100" y2="100" />
    <line class="lineClass" x1="100" y1="100" x2="200" y2="100" />
    <line id="lineId" x1="200" y1="100" x2="200" y2="50" />
    <line class="lineClass" x1="200" y1="50" x2="100" y2="200" />
  </svg>
</div>
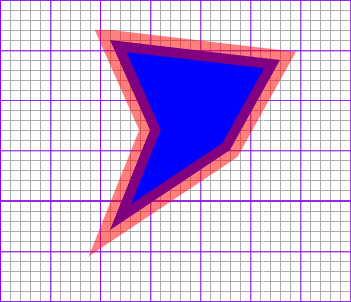
다각형
다각형의 작성
1
<polygon points="[code] [code] [code]..." />
속성
- code : 다각형을 구성하는 x,y좌표 공란으로 구분함
1
2
3
4
*{margin: 30px; padding: 0;}
#exampleSub.bg{background:url(./img/line.jpg) 0 0 repeat;}
#exampleSub svg{width: 1000px; height: 250px;}
#polygonSample{fill:#00f; stroke:rgba(255,0,0,0.5); stroke-width:20;}
1
2
3
4
5
6
7
8
9
10
<div id="exampleSub" class="bg">
  <svg>
    <polygon id="polygonSample"
      points="80,10
      250,30
      200,120
      80,200
      120,100" />
  </svg>
</div>
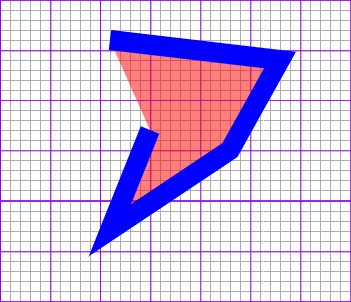
polyline
폴리라인의 작성
1
<polyline points="[code] [code] [code]..." />
속성
- code : 폴리라인을 구성하는 x,y좌표 공란으로 구분함
1
2
3
4
*{margin: 30px; padding: 0;}
#exampleSub.bg{background:url(./img/line.jpg) 0 0 repeat;}
#exampleSub svg{width: 1000px; height: 250px;}
#polylineSample{fill:rgba(255,0,0,0.5); stroke:#00f; stroke-width:20;}
1
2
3
4
5
6
7
8
9
10
<div id="exampleSub" class="bg">
  <svg>
    <polyline id="polylineSample"
      points="80,10
      250,30
      200,120
      80,200
      120,100" />
  </svg>
</div>
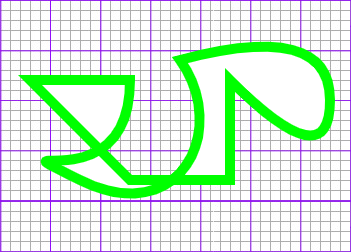
path
복잡한 선의 작성
1
<path d="[path Code]" />
[path Code]
- M[x][y]: 작도 시점 이동:이동할 X,Y좌표
- L[x][y]: 직선 그리기:선을 그릴 X,Y좌표
- H[x]: 수평선 그리기:수평선을 그릴 X좌표
- V[y]: 수직선 그리기:수직선을 그릴 Y좌표
- C[c1x] [c1y] [c2x] [c2y] [x] [y]: 커브 그리기:조절점1의 X,Y좌표 조절점2의 X,Y좌표 커브종점의 X,Y좌표
- S[c1x] [c1y] [x] [y]: 단순 커브 그리기:조절점 X,Y 커브종점의 X,Y좌표
- Q[c1x] [c1y] [x] [y]: 2차 베지어곡선:조절점 X,Y 곡선종점의 X,Y좌표
- T[x] [y]: 베지어곡선:곡선종점의 X,Y좌표
- A[rx] [ry] [degx] [func] [direc] [x] [y]: 타원 호:X방향 지름, Y방향 지름, X축에 대한 경사도, 호 생성방법, 회전방향, 호끝점의 X,Y좌표
- Z: pass 닫기
1
2
3
4
*{margin: 30px; padding: 0;}
#exampleSub.bg{background:url(./img/line.jpg) 0 0 repeat;}
#exampleSub svg{width: 1000px; height: 250px;}
#passSample{fill:#FFF; stroke:#0f0; stroke-width:10;}
1
2
3
4
5
6
7
8
9
10
11
12
13
14
15
<div id="exampleSub" class="bg">
  <svg>
    <path id="passSample"
      d="M50 50
      L150 150
      H250
      V50
      Q350 150 350 70
      T200 30
      C250 100 200 200 100 150
      S150 180 150 50
      Z"
    />
  </svg>
</div>
문자의 작성
1
<text x="[x]" y="[y]">[문자열]</text>
속성
- x : 문자열 위치의 X좌표
- y : 문자열 위치의 Y좌표
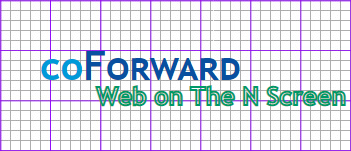
문자열 그룹의 작성
1
<tspan dx["dx"] dy="[dy]">[문자열]</tspan>
속성
- x: 문자열 위치의 X좌표
- y: 문자열 위치의 Y좌표
- dx: 원래 문자열 위치에서 변경할 X좌표 거리
- dy: 원래 문자열 위치에서 변경할 Y좌표 거리
1
2
3
4
5
6
*{margin: 30px; padding: 0;}
#exampleSub.bg{background:url(./img/line.jpg) 0 0 repeat;}
#exampleSub svg{width: 1000px; height: 250px;}
#coForward{fill:#0099D8; font-size:40px; font-style:normal; font-weight:bold; font-family:Trebuchet MS, Arial, Helvetica, sans-serif;}
#coForward tspan{fill:#0850A0;	font-variant:small-caps;}
#nscreen{font-size:25px; font-family:Trebuchet MS, Arial, Helvetica, sans-serif; font-weight:bold; fill:transparent; stroke:#096; stroke-width:2;}
1
2
3
4
5
6
7
8
<div id="exampleSub" class="bg">
  <svg>
    <text id="textSample" x="60" y="100">
      <tspan id="coForward">co<tspan>Forward</tspan></tspan>
      <tspan id="nscreen" dx="-150" dy="25">Web on The N Screen</tspan>
    </text>
  </svg>
</div>
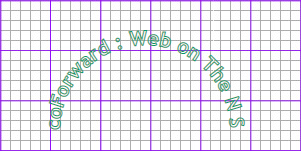
textPath
문자열이 흐를 패스를 지정
1
<textPath xlink:href="[#패스 아이디]">[문자열]<textPath/>
속성
- #패스 아이디: 패스로 지정한 요소의 ID
1
<defs />
SVG 요소를 정의 화면에는 표시되지 않음
1
2
3
4
*{margin: 30px; padding: 0;}
#exampleSub.bg{background:url(./img/line.jpg) 0 0 repeat;}
#exampleSub svg{width: 1000px; height: 250px;}
#nscreen{font-size:20px; font-family:Trebuchet MS, Arial, Helvetica, sans-serif; font-weight:bold; fill:transparent; stroke:#096; stroke-width:1; text-align:center;}
1
2
3
4
5
6
7
8
9
10
11
12
13
14
<div id="exampleSub" class="bg">
  <svg>
    <defs>
      <path id="textPath"
        d="M80 150
        A10 10 0 0 1 250 150"/>
    </defs>
    <text id="nscreen">
      <textPath xlink:href="#textPath" >
        coForward : Web on The N Screen
      </textPath>
    </text>
  </svg>
</div>